Pages

Sunday, December 12, 2010

And the winners are....

Last week was SO fun! I hope you got at least an idea or two, or just had a good time entering all the raffles. But I won't drag this out, I will get on to all the winners! I again used Random.org to decide the winners, and ran the numbers again if the same person won so everybody would have a chance to win something. If you gripe at me I promise to send your gift to someone else!;)

Day 1- Winner of the Ribbon Twirler: Rachel Dawn
Day 2-Winner of the Jar of Nuts: Grams/Lisa
Day 3- Winner of the Cup Sleeve & Gift Card: Clare
Day 4-Winner of the Hand Towel Apron: Lisa Dawn
Day 5- Winner of the Cake Stand: Lisa

P.S. Since Clare wanted the Green cup sleeve and I originally pulled Rachel Dawn's number but she had won already, I am sending Rachel the black cup sleeve as well.
Whew! Hope this seems fair, I tried my hardest!
P.P.S. I realized Kelly didn't win ANYTHING at all, and she is one of my biggest fans! So if she sends me a comment letting me know which project was her favorite I will see what I can do.:)
I really did enjoy sharing all my ideas with you. So much in fact that I am still gonna post a couple of super fast ones this week. So be watching for them. However I won't be raffling them. Mostly cause they are things that wouldn't mail well, or weren't very big, and because it is getting to close to Christmas to try and mail them out in time. Thanks so much for all your fun comments last week, you made my days brighter!

Friday, December 10, 2010

This Gifty Takes the Cake!

The Gifty today can't even really be qualified as a craft, it is SO stinkin Easy! However it is truly cheap & looks good too, so I will share all two steps involved;)

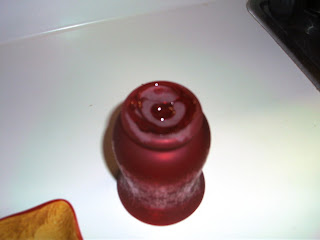
Today's Gifty is a Cake Stand!

Gather your supplies: One Plate of your choice, any candle holder that has a flat top & bottom, & E6000 glue.

Now ready for these complicated step by step instructions?!
1) Turn your Candle Holder upside down and apply a strip of glue all the way around the edges. ( I know it looks like I put glue in the middle, I did NOT that is just the color of the glass)

2) Take your plate and turn it upside down & place candle holder in middle glue side down.


3) Allow to dry for 24 hours. And Voila you have this cute little cake/cookie/candy stand to take to your neighbor or give as a perfect Hostess gift at a Christmas Party. And it took you like 2 minutes and cost less than $5 bucks:) I bought my plates at Tjmaxx or Kohls and paid about $3 a piece for them. Then candle holders came from Micheals or Kmart and I paid less than $2 for each of them.

So since everybody cried "Foul" yesterday, I am giving away EITHER example today. So just leave a comment telling me which one, and what yummy thing you would put on it. All winners will be listed sometime this weekend.
P.S. The Poinsettia one is much prettier in person, I really need a new camera!

Thursday, December 9, 2010

Tie this gifty on for size!

Today's Gifty is by far my favorite idea this week. It is an adorable dish towel apron! This little project takes less than 10 minutes to complete, cost less than $5, and is SO cute!

All ya need to get started is a generous size dishtowel (usually any that aren't made from terrycloth or such work). Mine was from Target's last year clearance and it was about 18x28.

You will also want some good width ribbon, and any embellishments if you so choose. Now begin by laying your towel out and cutting it about 5/8ths the short way. This does not need to be an exact measurement you are just going to iron down and hem anyway. So basically cut it as short or long as you want:)

After you iron your hem down turn right side up and lay about 6 feet of ribbon across the top where your hem will be. If you want a side bow like I used, just position your ribbon about a foot or so more to one side. Run a straight stitch across the top & bottom of the ribbon to anchor in place and Wal-lah! cutey Christmas apron finished!

Now I loved my snowman one so much, and he goes with my decor so I can't give him away. However I made my favorite readers a different example, and one commenter can win the apron pictured below. I had trouble finding towels that had cute appliques already on them like the snowman one, so I bought a cute patterned towel and embellished it with some fabric flowers. The flowers are simply safety pinned on so they can be removed when you wash the apron. Now go buy towels and whip a dozen of these cuties for all the gals you know!;)

Wednesday, December 8, 2010

A cup of comfort and joy!

Today's gifty is probably the most complicated idea I will do all week. However I was determine to conquer it so here is my attempt:

 It's a reusable cup sleeve! I actually have wanted to try these for a while now, and now that I have figured them out I have made like 6!
I used the tutorial found here as a basic guide Reusable Coffee Sleeve. However I modified it by making my pattern larger and lining my regular fabric with felt for durablity and thickness. If you use flannel this isn't neccassary.
So first I took a disposable sleeve and made a pattern on some cardstock and added a generous 1/4 inch for seam allowance.
I then traced around the pattern on my fabric and cut out.


If you are lining with felt this is where you would trace around the disposable sleeve directly onto your felt and cut out. You want your felt to be slightly smaller than your fabric, this is why you use the paper sleeve. Place your fabric with right sides facing together and sew as directed in the tutorial above.
Turn you sleeve right side out and finish with a top stitch. This is actually the most complicated part, but once you get the hang of it it isn't so bad. 


And TaDa! You have an adorable, washable, reusable coffee sleeve to tuck in your purse for all those Starbucks runs:) This also makes a fabulous gift! Which is why I am offering 1 commenter their choice of either sleeve below and a $5 dollar gift card! Just leave a comment telling me which sleeve you prefer. 


Disclaimer: If you sew on a regular basis or well, you may not want to enter the drawing! I am by no means professional level and there are plenty of flaws, however I thought the giftcard might balances that out;)

Tuesday, December 7, 2010

Sugar & Spice and....NUTS!

Today's Gifty is SO ridiculously easy, however it is delicious and most people adore them! We are gonna make Sugar & Spice Nuts. These are similar to the candied nuts you get from Vendors, however mine aren't quite as sweet not as heavily coated. You won't need much for this project, so lets get started!

Grab the following ingredients: Sugar, Cinnamon, Nutmeg, Clove, Salt, Egg White, and 3 cups of a plain unsalted nut(s) of your choice. I will post the actual recipe at the end of my post.

You will mix all the ingredients together in one bowl in then spread on a greased jelly roll pan.

 Bake in oven for 1 hour at 250* and then let cool COMPLETELY before removing. Scoop some of these little guys into a jar, add some embellishments and you have a yummy gift that everyone I have ever given them to LOVED. As in asked for the recipe! 


The recipe for the Nuts is as follows:

1/2 Cup Granulated Sugar
1/2 tsp Salt
1/4 tsp Cinnamon
1/4 tsp Nutmeg
1/8 tsp Cloves
1 Large Egg White
3 Cups unsalted Nuts. ( I used Pecans, Almonds, & Peanuts this time. However I normally use Cashews instead of Peanuts. Honestly my husband and I think a thing of nothing but Pecans would be divine!)

Mix all ingredients together in large bowl and spread on greased jelly roll pan. Bake at 250* for 1 hour and let cool completely.  Note: NO matter how much you grease the pan these guys STICK, you have to kinda scrape them off. If you try this with one of those mats and have better results PLEASE let me know!

And that my friends is IT! So easy, so yummy, and so fun to give. Make sure you leave a comment if you want to win the jar I made last night that is in the picture. I am giving these to my kids Awana teachers, and our Schwans guy:)

Monday, December 6, 2010

Let the Week of Gifties & Giveaways Begin!

So I am super excited to share this week with you! I have several fun little crafty/cooking things that I made, and I will be showing you at least one idea every day this week. Then I will randomly select a commenter to give the example away to! How fun for me & you:) For simplicity sake I will be selecting the winners from the entire week this weekend. Make sure when you leave a comment I have some way to contact you encase you win and I need your address.

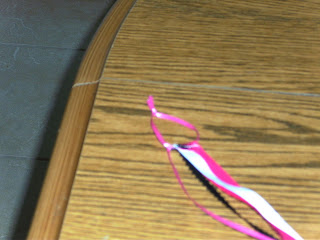
So with out further ado...Monday's gifties is a Ribbon Twirler. This cute little idea is perfect for any little girl and a snap to make. And if that isn't enough incentive the total cost is less than $3! Here is what you will need to start this project: A 12 inch piece of dowel rod (mine was about the same diameter as a dime), 3 to 4 coordinating ribbons in different widths, acrylic paint to match, and one "eye" like from a hook and eye set. I found these at Lowes in 2 & 3 packs depending on size for less than a buck.


At this point you will probably need to drill a hole in the end of the dowel rod so that it is easier to insert the eye. I had my handy husband do this;) Then using the eye as a hand hold proceed to paint your rod the color of your choice.
After painting the rod lay across a paper plate to dry. This won't take long! I then applied a second coat just for good measure, and allowed it to dry also.

 While your rod is drying, cut 5 feet of each ribbon and then make a separate small loop ( about the size of a half dollar) from your thinnest ribbon and knot it closed. Take your other ribbons and barley thread them through your ribbon loop, leave just enough ends to either sew or hot glue the ends down. So now you should have a loop with the 5 feet of different ribbons trailing down it:)


Take your loop and squeeze it through the small slit on the "eye". This basically finishes your Ribbon Twirler! You can hot glue the small slit shut if you are worried about the ribbon coming back through, but I didn't find it necessary on mine. I also would think a nice coat of clear shellac would a bonus too, but I didn't have any. This is what the finished product looks like:)


My daughter LOVED this thing and actually requested we make some for her friends for Christmas. I think they would be great stocking stuffers! It is just a fun silly girly thing to make:) Hope you enjoy and be sure to leave a comment if you would like to win the pink & black one from my demo!

Friday, December 3, 2010

Winners! & More to Come...

So I used the website Random.org to decide on the winners for the shopping list(s), and the results were #1 & #2. So Clare & Lisa Dawn you are the big winners:) Since Clare wanted the Country one, I will send Lisa Dawn the Contempo one. I will get them in the mail this weekend, hope you enjoy!

Now if you didn't get overly excited about the notepad idea, or if you were bummed you didn't win, stay tuned! All next week is Gifties & Give Aways on Robyn's Ramblings. I will be making several little cute craft & food items that would make easy gifts, and every day I will give my example away! I am SO excited to do this, it will be fun & different:)

Wednesday, December 1, 2010

Making a List....Giving it Twice!

So on this first day of December, I am very much in the spirit of Giving! I did some Christmas shopping today, and of course I reference my handy shopping list several times. I love, Love, LOVE a list! Don't you? So since I know you all agree I am going to share this super cheap & cute idea for you very own homemade shopping list pads. AND....because I feel like giving gifts today, I am going to give the two examples I made away also:)

But first, how to make this little guys encase you want to make some as gifts or if you are like me and go through list pads weekly;)  All you will really need to start these is small legal pads (that you can have the office store cut in half for you), sturdy scrapbook paper, embellishment, adhesive of your choice, and preferable a paper cutter. However scissors will work, I am just lazy:)

Start by cutting your scrapbook paper 2 & 5/8 of inch across and 3 & 1/2 inches long. Now I got kinda fancy here and used a punch to make a pattern on the edge of my paper but you can leave it straight it is still very cute. I then measured up about 1 & 1/4 inches and scored a 1/4 inch space that will fit the top of the pad. This just makes it lay nice, you don't have to score. You can glue down your paper to the back and fold over the front with almost the same effect.


After you have scored/ folded you paper attach to list pad with preferred adhesive and then embellish with Ribbon, Buttons, Stickers, Etc. I think the adorable little paper flowers my sister Clare makes would be super cute, but I haven't had the patience to try any. And that my friends is IT! In like 3 minutes you have cutesy, personalized shopping pads.


This is the one I made for the blog, I will call this one "Country Christmas".
And this one below is one I made cause I am enamored with the colors Black, White,& Red this season. SO I am calling this one "Contempo Christmas"
If you want to get one of these guys in the giveaway, just leave a comment telling me which one you prefer and how awesome it is that these are so quick and cheap;) I will randomly select 2 people on Friday and mail the list pads out this weekend! Merry Christmas & Happy Shopping:)

Tuesday, November 23, 2010

5 Fall Faves

I haven't got to experience a lot of "fallish" weather here in the Carolinas, but it hasn't kept me from getting in the fall mood. Some of the things that have helped me do this are in this list, but the best part is NONE of them cost more than $5! Sometimes it truly is the little things in life. So here are a few of my favorites things...
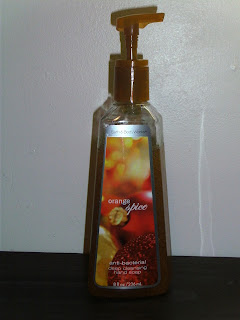
  1. Orange Spice Hand Soaps from Bath & Body. I love this new scent so much that I bought 3 of them! 2 Foam versions for the kiddos Bathroom & 1 regular for my kitchen sink. Plus the color coordinates beautifully with both rooms:)
 2. This is a gorgeous oval plate that I picked up at Marshalls for $4! It is a great size, not to big. SO I am sure you will be seeing in several of my Food Posts:)


3. Bear Creek Soups!!! I LOVE these! We have tried several flavors and haven't had a bad one yet. I love putting this packet and some water in my crockpot and knowing I will have a tasty meal with NO effort later that night. That is truly how easy these are, just add water. And while they are a little pricey (especially if you have to buy them in a regular grocery store) I pay just under $4 for them in the commissary. But they are totally worth it since normally all I add is water and usually a meat. For the one pictured (which is our family's favorite) I saute turkey kielbasa and add it in towards the end.
P.S. You can totally make this in a sauce pan in less than 1/2 an hour, but I am having an affair with my slow cooker right now so I put anything I can in it!


4. The Night Before Thanksgiving. This book has been in our house since before Gillyan was born, and we bring it out every year and read it the week of Thanksgiving. It makes me smile because so many of the little things in it remind me of my family. It is written in the same form as the Night before Christmas, so it is a fun read that my kids look forward to:)

5. Starbucks drinks! I love that I can taste the season in a yummy Pumpkin Spice Latte, or cozy up with some Hot Cocoa. But I am loving even more that I scored this box of Salted Caramel Cocoa at TJ Maxx for around 4 bucks! That means I can make my own cup of cozy at home for under 60 cents, and that makes it taste even better:)
Hope you are enjoying what's left of fall, and be sure and leave me a comment telling me what your favorite fall thing this year has been!

Wednesday, November 17, 2010

Roast 2 Ways & a Bonus.

So I have actually been cooking at home the last couple days, and was so excited about how easy and yummy these recipes were that I had to share! I have been breaking in my new crockpot, and the most recent triumph was this super easy roast.

Easy 4 packet Roast
Ingredients:
1 packet ranch dressing mix
1 packet brown gravy mix
1 packet Italian salad dressing mix
1 packet onion soup mix
1 roast of choice ( I used a 3 lb round roast)
1/2-3/4 cup beef broth
Carrots, Onion, Potatoes cut to taste.

Place roast in crockpot.  Arrange vegetables around the roast if being used.  Sprinkle the mix packets over the roast.  Pour Broth over all.  Cook on low for 6-8 hours. Now I personally think my roast was totally done at 6 hours on low, but I am sure it depends on the size of your meat and the size of your crockpot. This roast was not exceptional, however it was pretty tasty and did fall apart. I think next time I may skip the ranch packet and double the onion soup mix, but that is just my personal taste. Either way this will be a repeat in the Goodman household. 
Just a note as you look at the photo, I do NOT believe there is a good way to photograph roast beef or vegetables. Especially not if you are an armature! So please base your expectations on the review, NOT the photos;)
Now fortunately for our family of four a 3 lb roast made plenty for dinner with leftovers for my next yummy meal! 

French Dip Sandwiches
Ingredients:
1-2 lbs shredded pre cooked roast
4 Chibatta Buns
6-8 slices good white cheese such as Gouda, Muenster or Harvarti
McCormick's Au jus Packet
2 Cans Beef Broth

For this "cake" meal all you will need to do is heat your meat in a saucepan with one of the cans of beef broth. Follow directions on back of Au Jus packet, except replace half the water with beef broth. While the beef and au jus are cooking take your ciabatta rolls, split them and place on baking sheet. At this point I brushed a little butter and sprinkled some garlic salt on the rolls, but that is entirely optional. Place rolls under broiler till light tan. At this point I drained the meat and shredded it even more. Pile meat on one half of roll and cover with 1&1/2 to 2 pieces of cheese, place bake under broiler till cheese is melty and buns are browned. Serve on plate with small bowl of Au jus and chips. That's it:) Again my camera, the lighting in my home, and myself did NO justice to how yummy this dish was. Sorry!
The last thing I want to share is the "bonus" recipe. This little gem isn't so much a recipe as a idea. You may notice in my first photo the little yellow pile of stuffing. That is actually a "stuffin muffin"! These were so easy and tasty. All I did was buy Stovetop Stuffing ( I used Cornbread flavor) and prepare according to the microwave directions with butter. Then I scooped the mix into a muffin pan. I made 6 very dense muffins by cooking them at 375 for 12 minutes or so. In retrospect I think it would have been better to make more like 8 muffins, so they would have been a little crunchier. But I also used a stone so that means I could have just needed to bake them longer. However these were a fun new way to eat something that I typically think of as thanksgiving food, plus I loved how they were crunchy on the outside and dense on the inside like a muffin:) Hope ya try one or two ideas of these and let me know!

Tuesday, November 9, 2010

Washington DC Fall 2010

So Steve's work sent us to a leadership conference in Virginia this last weekend. We had conferences Friday & Sunday, however Saturday was "Family Day". So since my hubby has never been to the nations capitol he decided to hop on the metro and drag our family on a whirlwind tour of DC. The kids actually really enjoyed it, and we took a bunch more pics. But I will just post the highlights.
P.S. The Tour of the Capitol Building was arranged by Steve's unit and actually took place on Friday.


Here is the link to see the pics of our trip PhotoBucket Trip to DC 
Hit the Red Slideshow button in the upper corner for the best view with captions.

Friday, October 29, 2010

A Googly Eye Pumpkin & Brain Cupcakes

So if you know me at all you realize that we don't truly celebrate Halloween. Instead my family may or may not participate in a "Fall Festival" with or without costumes, and then the actual night of Halloween we lay low in our home with pizza, goodies, and a family movie. However this year we were put into the position of not being able to gracefully opt out of Halloween activities without it reflecting poorly on my husbands position. So I tried to get in the spirit of things without being to creepy. What I came up with was a variation I saw on a painted pumpkin and then some super basic cupcakes decorated like brains.

So the first thing I tackled was the painted pumpkin. This was a decoration for my Husband's car, which is the vehicle we will be using at "Trunk or Treat". His car happens to be a metallic blue, so since I am a matching freak, I used blue and black as the theme for all his trunk decorations.
If you want to try your hand at one of these, the project is cheap and doesn't require much. Here's what you will need:
  • Pie Pumpkin
  • Googly Eyes
  • Acrylic Paint
  • Sponge Brush
  • Hot Glue Gun & Sticks
I had seen these in a magazine where they had spray painted pumpkins black or white and then glued googly eyes to them. However I have not had the best experience lately with spray paint, plus I wanted it to be sparkly blue which I couldn't find. So instead I bought a 67cent bottle of sparkly blue acrylic paint at Hobby lobby and used a sponge brush to apply it generously.


I then allowed it dry some, and then applied another coat. I even placed it upside down on a glass and painted the bottom.


After allowing the entire pumpkin to dry completely for a couple hours, I used a hot glue gun and applied googly eyes in random spots.
I thought this little guy turned out fairly cute and he cost me less than $4 total!

I then attempted to make Brain Cupcakes for the Bake Sale that we are having in conjunction with the Trunk or Treat. This cupcakes simply consisted of Red Velvet cake mix cupcakes, and grossly dyed cream cheese frosting. (Please ignore my washing machine in the background! It is simply the only spot in my whole house at night that I can get a decent picture:P)


I had seen the concept online in a couple places, and basically all you do is take your cupcake and then a icing bag with a large round tip and place two lines down the center of the cupcake, with squiggly lines on either side to fill the reminder of the cake. Mine weren't quite as nice as many I had seen online, however the cream cheese icing I used was very soft. So the icing wasn't holding it shape well. However my taste testers (Gilly & Gidey) said they were perfect;)

So while I hope we go back to our quiet home celebration next year, I did enjoy trying my hand a few things I wouldn't have otherwise had an opportunity to do. Happy Fall Festivities!

Tuesday, October 26, 2010

Feeling Like Fall Finally, so I made Apple Dumplings!

Yesterday was the first day here in Carolina that even pretended to feel like fall. So I broke in my new crockpot with a yummy soup and then made this fun looking recipe I found on a couple different blogs for easy Apple Dumplings. The recipe seems to have originated from Pioneer Woman but I found it on Our Best Bites. I also halved the recipe, the original made 16 dumplings but our family would never eat that many. So I am posting my modified/halved version.

Easy Apple Dumplings

Ingredients:
  • 1 Medium to Large Tart Apple
  • 1 Can refrigerated Crescent Rolls
  • 1 Stick Butter
  • 3/4 Cup Sugar
  • 1/2 Tsp Vanilla
  • Cinnamon to Taste
  • 4 oz Mountain Dew or Sprite
Spray a 8x8 pan with Pam. Peel and cut your Apple into 8 wedges  (I used my apple wedger and it made 10 pieces, so mine were a little small). Separate the can of crescents into 8 triangles. Then wrap each apple wedge, covering it completely with the crescent triangle. I placed my apple at the wide end of the crescent and then rolled it up and tucked the edges over the ends of the apple. Place each crescent covered apple in the 8x8 dish. Now take your butter and melt it in a saucepan. Add to the melted butter the vanilla and sugar. Stir just to combine, then pour over the pan of apples. Then take your soda and pour it around the edges of the dish. Most recipes I saw said to use 6 oz of soda, but I barely used 4 and thought it was plenty! Sprinkle entire pan with cinnamon to taste. Place in oven that has been preheated to *350 and bake for 40 minutes. Once done allow to cool some and then serve with ice cream. The dish make a gorgeous carmelly syrup that I drizzled over the dumplings and the ice cream:)  Yummy and Easy, my kinda recipe!

Thursday, October 7, 2010

I'm BAAACK! with a Candy Corn Wreath in Hand;)

I know everyone missed me more than words can say!;) To be honest the time away was REALLY good for me, and got some of my creative juices flowing. So hopefully the posts will be a little more consistent, but no promises!

Onto my real purpose of this post...My Candy Corn Wreath!

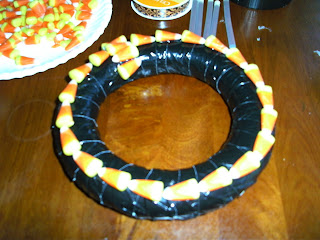
Now while I HATE eating those vile little sugary candies, I also smile when I see them because they remind me of my favorite Aunt who adores them. So when I saw this wreath on the cover of a magazine I knew I had to make it in her honor. This little guy turned out to be fairly simple and not very spendy, which are both things I look for in any craft.

Whatcha need is pretty basic: 
  • Any size Styrofoam wreath ( I used 6 inch because I am cheap & lazy)
  • Black duck tape
  • Candy Corns ( I recommend Brachs because they are sturdy and some of the prettiest)
  • Ribbon
  • Hot Glue Gun & several Glue Sticks
  • Paper Plates for Glue Gun drippings & Candy Corn picking
 1) Wrap your wreath in the duck tape. This didn't not look that pretty to me at first, and honestly was rather lumpy. But it didn't end up mattering at all.
2) Heat Glue Gun, and grab a paper plate to pour your Candy Corns onto. All the instructions I read said at this point to lay the candy corns out on your wreath to get a good idea how to fit them on. Again, because I am lazy I just decided on a starting point and figured anything that didn't come out right I could hide with ribbon;) I did however follow the instructions to place the rows opposing each other and that worked out great!
3) Continue to glue candy corns on wreath till it is a full as you want. As you can see from my pic above I originally intended to glue only 4 rows, but since I bought the huge bag of candy corns and it was coming together faster than I thought, I went on to do 6 rows which made it very full:) I only ended up having one row not come out "even", and I bet from the pic you can barely spot it, so I didn't worry.
4) After you have glued all the candies in place, grab your ribbon and make a hanger with a bow. My recommendation here would be to go for wide/thick ribbon. I was again being cheap and bought some pretty decorator ribbon(that is actually black & orange, NOT black & pink like it looks in the pic) that was a buck and the wreath is to heavy for it:( However it LOOKS cute!
So there ya have it. A project that took less than 1/2 an hour, and only cost about $10. Granted I did have some Michael's coupons I used on the wreath and tape, however I easily think you could skip the foam wreath and the duck tape by using a cheaper straw wreath with cute fall looking results. Let me know if you try this and how it turns out. Be back soon with pictures of my Gilly Bean's 8th Birthday!


Monday, August 16, 2010

Short & Sweet

I am just logging a short post to let everyone know that I am removing my self from the internet world (sort of).
I won't be posting blogs anymore at least not for a while till I work through this funk. I have also deactivated my facebook account. I feel it takes up to much of my time and isn't something that I usually find uplifting. Actually lately it has been the opposite, it only serves to depress or bring me down.  I am sure none of these actions are very permanent, I just need to know that I can live without FB. And so far my blog as just been making me feel like a failure, which was not the original intent.So what I am getting at is if ya need to catch up with me call, text or even send an email. I am not dead nor am I dying, I just really need some down time...

Tuesday, August 3, 2010

Tasty Tuesday-Chicken Salad

So strangely enough one of my kids favorite lunches is chicken salad. I love this because chicken salad is pretty easy and says summer/light food to me! I had to play around with a few different recipes to get the flavor and consistency that my family likes, and to be honest I don't follow this recipe exactly. It is more of a guide line so I don't forget any key ingredients. Here is the Goodman family's favorite chicken salad:

Chicken Salad
2 cups cooked Chicken ( I have used it all! Canned, Leftover, Roasted Chicken from the Store, it all works great!)
1/3 cup Sour cream
1/3 cup Mayo
Squeeze of lemon juice
1/4 cup diced celery
1 heaping tablespoon Pecan pieces ( I cut them very fine or the kids don't like it)
Diced onion to taste ( I have used white and green onions, I prefer white but the green looks pretty)
1 tbs dill pickle relish
Dash of salt, celery salt, and about 1 tsp pepper.

Mix Chicken with Sour Cream, Mayo and Lemon Juice. Add in next 4 ingredients and then season to taste with Spices.

I know this is almost to easy to post, but after serving this so many times this summer I felt it deserved a post. You may notice that my recipe is on the dry side, this is how my family prefers it. However this is easily changed to a creamier version by simply adding more sour cream and/or mayo. We have served this on Croissants, French Bread, Wheat Rolls, and even in a ball with crackers on the side! My kids don't seem to care how I serve it as long as I don't put in to many nuts or to much pickle;)  So there is a tasty simple recipe for you, go whip it up and take your kiddos on a picnic!

Tuesday, July 27, 2010

Tasty Tuesday- Menu Plan/Back in the Groove

So we are almost settled in here in NC, and after eating out for basically three straight weeks we are ready for some home cooking! So I thought I would get back in the swing of a schedule with a menu plan. Payday is actually this week, and we are going out of town this weekend. So my menu is actually only 5 days this time since I will plan my bi-weekly shopping and menu once I am back in town. However before we head on our road trip I am going to attempt to turn out the following meals:

Lunches:
1)Buffalo Chicken Wraps, Chips & Gauc, Cherries
2) Pasta Salad & Grapes
3)Quesadillas, Salsa & Chips, Oranges
4)BLTS, Pretzels, Veggies & Dip
5) PBJ, Cheetos, Blueberries

Dinners:
1)Spaghetti with Sausage, Salad, & Garlic Toast
2)Grilled Teriyaki Burgers, Linda"s Crunchy Asian Salad,Grilled Pineapple
3)Chicken "Brats", Potato Salad, Corn on the Cob
4)Calzones, Dipping Sauce, Fruit
5)Cobb Salads, Watermelon, Crescent Rolls

So as you can see I'm not getting real adventurous in the cooking department this week! Not even really any "recipes" to most of this stuff, however if you see something you want the run down on let me know:)

Promise to get back in the routine with the blog thing, but moving was more work than I expected! Hope to post pics of the new house some time soon. Wanted to wait till the kids rooms were done being redecorated, and maybe even the living room overhaul, but the funding has run out before my good intentions! So I won't leave you hanging that long;)

Monday, June 7, 2010

Manic Monday- VBS 2010

So this morning was a little bitter sweet. I dressed my guys in their brand spankin new VBS shirts. Did their hair, so it would at least look cute during Worship Rally. Then took the mandatory VBS pic. So far all that has been the sweet part. The bitter part was knowing I wasn't going to be there. That I wouldn't be working in a fun ranch theme decorated room, or eating Cowpoke snacks, or making western themed crafts. For the first time in LOTS of years, I wasn't even going to merely be an onlooker, I just wouldn't be there:(


This is due to many reasons that I won't even go into on this blog, suffice it to say there is a season for everything. And obviously this was my season to sit on the sidelines. I am thrilled for my little people that they get to participate in all the fun, yet sad in my heart that I am not helping make the fun. Oh well at least I will get to live vicariously through my kids.


Here was their rundown on this morning:
Gilly: "Mom first we did worship rally in the big church and sang and did offering, and guess what?! The girls won offering and I need to bring money tomorrow. Next we went to Snack" Gideyon butts in at this part.
Gideyon: " Yeah at snack we made"mix trail". It had a lot of stuff in it"
Gilly: Do you think we can make trail mix sometime Mom?, Cept without the round cereal in it cause I don't like that kind"
Gideyon: " Yeah maybe we could put Lucky Charms in it instead!"
Gilly: "NO cause it already has marshmallows in it!"
Me: We'll see, maybe you can each pick something to put in it. What else did you do at VBS?"
Gilly:" We went to art and got to make big people!"
Gidey: " And I found a wallet and the lady said that was tomorrows craft, so then I will have something to put my money in:)"
Gilly: "After that we went back to our room and had games, and then we went to big church for worship rally again, and I answered one the pastors questions!"
Gidey: " I tried to answer but I didn't get picked"
Me: " Well maybe you will get picked another day, the pastor can't pick everyone. So does this mean you had a good time and want to go back?"
Gilly: "Yes!!"
Gidey: " Yeah I guess so"


So as you can tell VBS was an overall hit, and I am glad for the sake of my kids that even though our church wasn't involved they still got to go to a fun program. And I am sure we will be singing the songs for weeks to come:)