Pages

Friday, October 29, 2010

A Googly Eye Pumpkin & Brain Cupcakes

So if you know me at all you realize that we don't truly celebrate Halloween. Instead my family may or may not participate in a "Fall Festival" with or without costumes, and then the actual night of Halloween we lay low in our home with pizza, goodies, and a family movie. However this year we were put into the position of not being able to gracefully opt out of Halloween activities without it reflecting poorly on my husbands position. So I tried to get in the spirit of things without being to creepy. What I came up with was a variation I saw on a painted pumpkin and then some super basic cupcakes decorated like brains.

So the first thing I tackled was the painted pumpkin. This was a decoration for my Husband's car, which is the vehicle we will be using at "Trunk or Treat". His car happens to be a metallic blue, so since I am a matching freak, I used blue and black as the theme for all his trunk decorations.
If you want to try your hand at one of these, the project is cheap and doesn't require much. Here's what you will need:
  • Pie Pumpkin
  • Googly Eyes
  • Acrylic Paint
  • Sponge Brush
  • Hot Glue Gun & Sticks
I had seen these in a magazine where they had spray painted pumpkins black or white and then glued googly eyes to them. However I have not had the best experience lately with spray paint, plus I wanted it to be sparkly blue which I couldn't find. So instead I bought a 67cent bottle of sparkly blue acrylic paint at Hobby lobby and used a sponge brush to apply it generously.


I then allowed it dry some, and then applied another coat. I even placed it upside down on a glass and painted the bottom.


After allowing the entire pumpkin to dry completely for a couple hours, I used a hot glue gun and applied googly eyes in random spots.
I thought this little guy turned out fairly cute and he cost me less than $4 total!

I then attempted to make Brain Cupcakes for the Bake Sale that we are having in conjunction with the Trunk or Treat. This cupcakes simply consisted of Red Velvet cake mix cupcakes, and grossly dyed cream cheese frosting. (Please ignore my washing machine in the background! It is simply the only spot in my whole house at night that I can get a decent picture:P)


I had seen the concept online in a couple places, and basically all you do is take your cupcake and then a icing bag with a large round tip and place two lines down the center of the cupcake, with squiggly lines on either side to fill the reminder of the cake. Mine weren't quite as nice as many I had seen online, however the cream cheese icing I used was very soft. So the icing wasn't holding it shape well. However my taste testers (Gilly & Gidey) said they were perfect;)

So while I hope we go back to our quiet home celebration next year, I did enjoy trying my hand a few things I wouldn't have otherwise had an opportunity to do. Happy Fall Festivities!

Tuesday, October 26, 2010

Feeling Like Fall Finally, so I made Apple Dumplings!

Yesterday was the first day here in Carolina that even pretended to feel like fall. So I broke in my new crockpot with a yummy soup and then made this fun looking recipe I found on a couple different blogs for easy Apple Dumplings. The recipe seems to have originated from Pioneer Woman but I found it on Our Best Bites. I also halved the recipe, the original made 16 dumplings but our family would never eat that many. So I am posting my modified/halved version.

Easy Apple Dumplings

Ingredients:
  • 1 Medium to Large Tart Apple
  • 1 Can refrigerated Crescent Rolls
  • 1 Stick Butter
  • 3/4 Cup Sugar
  • 1/2 Tsp Vanilla
  • Cinnamon to Taste
  • 4 oz Mountain Dew or Sprite
Spray a 8x8 pan with Pam. Peel and cut your Apple into 8 wedges  (I used my apple wedger and it made 10 pieces, so mine were a little small). Separate the can of crescents into 8 triangles. Then wrap each apple wedge, covering it completely with the crescent triangle. I placed my apple at the wide end of the crescent and then rolled it up and tucked the edges over the ends of the apple. Place each crescent covered apple in the 8x8 dish. Now take your butter and melt it in a saucepan. Add to the melted butter the vanilla and sugar. Stir just to combine, then pour over the pan of apples. Then take your soda and pour it around the edges of the dish. Most recipes I saw said to use 6 oz of soda, but I barely used 4 and thought it was plenty! Sprinkle entire pan with cinnamon to taste. Place in oven that has been preheated to *350 and bake for 40 minutes. Once done allow to cool some and then serve with ice cream. The dish make a gorgeous carmelly syrup that I drizzled over the dumplings and the ice cream:)  Yummy and Easy, my kinda recipe!

Thursday, October 7, 2010

I'm BAAACK! with a Candy Corn Wreath in Hand;)

I know everyone missed me more than words can say!;) To be honest the time away was REALLY good for me, and got some of my creative juices flowing. So hopefully the posts will be a little more consistent, but no promises!

Onto my real purpose of this post...My Candy Corn Wreath!

Now while I HATE eating those vile little sugary candies, I also smile when I see them because they remind me of my favorite Aunt who adores them. So when I saw this wreath on the cover of a magazine I knew I had to make it in her honor. This little guy turned out to be fairly simple and not very spendy, which are both things I look for in any craft.

Whatcha need is pretty basic: 
  • Any size Styrofoam wreath ( I used 6 inch because I am cheap & lazy)
  • Black duck tape
  • Candy Corns ( I recommend Brachs because they are sturdy and some of the prettiest)
  • Ribbon
  • Hot Glue Gun & several Glue Sticks
  • Paper Plates for Glue Gun drippings & Candy Corn picking
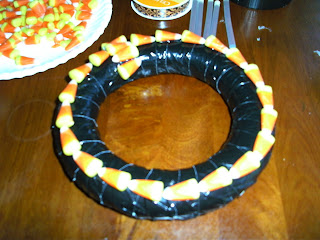
 1) Wrap your wreath in the duck tape. This didn't not look that pretty to me at first, and honestly was rather lumpy. But it didn't end up mattering at all.
2) Heat Glue Gun, and grab a paper plate to pour your Candy Corns onto. All the instructions I read said at this point to lay the candy corns out on your wreath to get a good idea how to fit them on. Again, because I am lazy I just decided on a starting point and figured anything that didn't come out right I could hide with ribbon;) I did however follow the instructions to place the rows opposing each other and that worked out great!
3) Continue to glue candy corns on wreath till it is a full as you want. As you can see from my pic above I originally intended to glue only 4 rows, but since I bought the huge bag of candy corns and it was coming together faster than I thought, I went on to do 6 rows which made it very full:) I only ended up having one row not come out "even", and I bet from the pic you can barely spot it, so I didn't worry.
4) After you have glued all the candies in place, grab your ribbon and make a hanger with a bow. My recommendation here would be to go for wide/thick ribbon. I was again being cheap and bought some pretty decorator ribbon(that is actually black & orange, NOT black & pink like it looks in the pic) that was a buck and the wreath is to heavy for it:( However it LOOKS cute!
So there ya have it. A project that took less than 1/2 an hour, and only cost about $10. Granted I did have some Michael's coupons I used on the wreath and tape, however I easily think you could skip the foam wreath and the duck tape by using a cheaper straw wreath with cute fall looking results. Let me know if you try this and how it turns out. Be back soon with pictures of my Gilly Bean's 8th Birthday!